Clothes dryer rack offers you linear feet of hanging space for drying towels, sweaters, wet jeans, delicate garments, and more! Rods can be used with most cloth clips for added convenience.
Features & Specifications
Width 120 cm
Sleek foldable design that Sets up in seconds.
Space-saving alternative to floor systems and easy to mount to the wall.
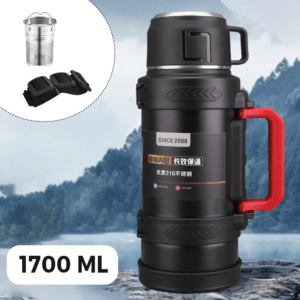
Body Material: High-grade 316 Stainless Steel (indicated by the label “优质316不锈钢”). This is superior to standard 304 steel, offering better corrosion resistance, especially against tea, coffee, or acidic beverages.
Insulation Type: Double-wall vacuum insulation.
Thermal Performance: Engineered for “Long-term insulation” (长效保温). Typically, flasks of this build maintain temperature for 24 to 48 hours for both hot and cold liquids.
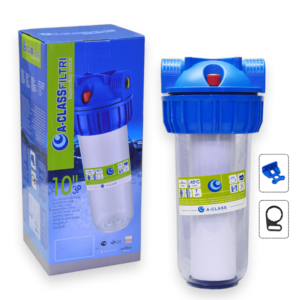
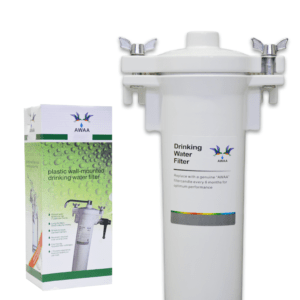
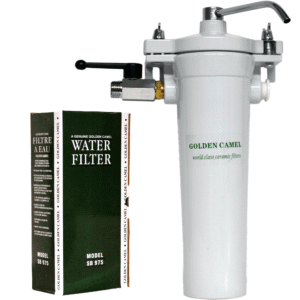
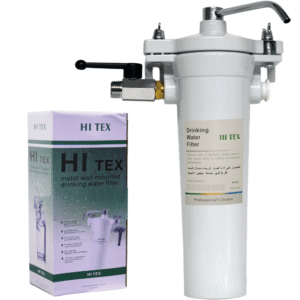
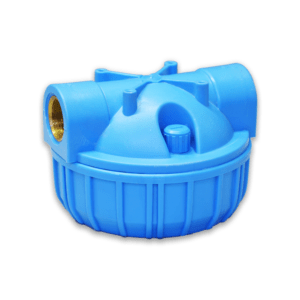
Now that you have bought an SB 975 water filter, you have taken the
first step to wards protecting you and your family from the dangers of
water-borne diseases.
The SB 975 water filter uses a ceramic element to trap the dangerous
bacteria which can cause diseases such as Bilharzia, Typhoid, Cholera and
Dysentery.
Follow the simple instructions qiven in this leaflet and your filter will
supply you with good, clean water for many years.
Installation
Remove the filter and element (3) from their protective packaging and
check each item against the drawing
Extreme cleanliness is important. Sterilise all parts except the element
(3) before assembly
if a standard element is to be fitted boil it in water for 20 minutes before
assembly. Boiling is not necessary with ‘Sterasyl’ elements, as they are
self-sterilising
Turn off the main water supply.
Two 5mm fixing slots in the filter body (6) enable the filter to be wall
mounted. The fixing slot centres are 112 mm.
Fix the filter body (6) to the wall in a convenient position above the sink.
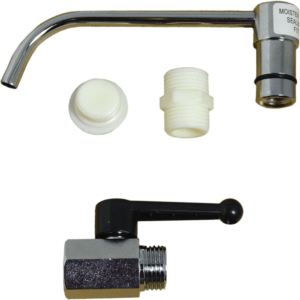
Determine which side of the filter body (6) the tap (5) is to be connected
and screw the plug (9A), having wound PTFE tape or similar on to it. into
the opposite side.
If the tap (5) and nipple (4) are supplied, remove the screw securing the
tap handle. Remove the handle. Wind PTFE tape, or similar, ontc one
end of the nipple (4) and screw it into the tap. Wind PTFE tape, or simi-
lar, onto the other end of the nipple and screw it into the filter body (6)
ensuring that the tap points in the desired direction. Re-fit the tap
handle.
NOTE:
It is important that when installing the filter there is some form of
isolating valve in the water supply line. This will enable element
cleaning to take place.
Place the washer (10) over the element mount.
Place the element mount through the hole in the Centre of the lid (11)
and screw the outlet spout (1) onto the element.
Place the element (3) into the filter body (6) and engage the slots in the
lid (11) on the studs (9).
Secure the lid in position with the wing nuts (12).
Connect the water supply to the tap (5) (if supplied), by means of a ½”
BSP fitting
Join our newsletter and get 20% off your first order
Be the first to know about our new arrivals, exclusive offers and the latest fashion update.
By subscribing, you agree to our privacy policy.
We care about your privacy
In order to provide you a personalized shopping experience, our site uses cookies. By continuing to use this site, you are agreeing to our cookie policy.

![Wall Mounted Cloth Dry Rack [ 120-CM ]](https://newqualityware.com/wp-content/uploads/2026/06/Wall-Mounted-Cloth-Dry-Rack-300x300.png)


![Wall Plaster Tube [ 250-G ]](https://newqualityware.com/wp-content/uploads/2026/05/1-min-3-300x300.jpg)